How to Take Screenshot in Laptop – Step-by-Step Guide for Windows & Mac
Ultimate Guide: How to Take Screenshot in Laptop for Beginners
Taking a screenshot is one of the most effective yet simple things you can do on a laptop. Whether it is saving a crucial message, documenting an error window, or sharing a screenshot from your desktop, knowing how to take a screenshot is vital. In this guide, we will discuss how to take screenshot in laptop, providing customized instructions for HP, Lenovo, and Mac laptops, as well as Windows 7, 10, 11 and macOS.
Why Learn How to Take a Screenshot?
Screenshots are used for:
• Providing an image for a technical difficulty explanation
• Making a tutorial or guide
• Keeping confirmation messages as proof
• Sharing the content on social platforms or emails
Now, let us explore the various methods of taking screenshots on different laptops
How to Take Screenshot in Laptop in HP
If you’ve got an HP laptop, the methods are roughly the same as other Windows laptops. Here are the approaches:
1. PrtScn (Print Screen) Button Method
• Hit the PrtScn button on the keyboard.
• This will take a shot of the entire screen and store it in your clipboard.
• Run Paint or any other picture editing software and paste (Ctrl + V) the screenshot.
• Choose your preferred file type and save the image.
2. Windows + PrtScn
• Click Windows Key and PrtScn together.
• The screenshot will be taken as the screen momentarily dims.
• You will find the image in your Pictures folder under the Screenshots subfolder.
3. Snipping Tool or Snip & Sketch
• Press Windows + Shift + S.
• Now draw the area you wish to capture.
• The selected image will be available on the clipboard. You can paste it in Paint or Word.
How to Take Screenshot in Laptop Lenovo
Since Lenovo laptops, like HP, are equipped with a Windows OS, the instructions are nearly the same:
• PrtScn: The full screen will be copied to the clipboard.
• Alt + PrtScn: Only the active window is captured.
• Windows + Shift + S: You can take a custom region screenshot with Snip & Sketch tool.
Due to the Print Screen function being embedded on some Lenovo models, pressing Fn + PrtScn may be required.
How to Take Screenshot on Windows 11 Laptop
The introduction of Windows 11 comes with a more modern design and user-friendly interface. Taking screenshots is very straightforward.
Method 1: Snip & Sketch using the Shortcut Key
• Click Windows + Shift + S.
• You can select either a rectangular, freeform, window or full-screen snip.
*The image can be edited or saved after being copied to clipboard.*
Method 2: Windows + PrtScn
*Captures and saves full-screen screenshot to Pictures >> Screenshots.*
Method 3: Alt + PrtScn
*Captures only the active window.*
*It can be pasted into Paint or Word using Ctrl + V.*

Screenshot in Laptop Windows 10
Options available to users:
1. Print Screen Key
*Simply pressing on Prt Scn copies the screen.*
2. Windows + Prt Scn
*Captures screenshot & saves it to This PC >> Pictures >> Screenshots.*
3. Snipping Tool
*Search “Snipping Tool” in the start menu.*
*Select Free-form, Rectangular, Window or Full screen to save captured image.*
4. Windows + Shift + S
*Opens Snip & Sketch toolbar for partial and quick captures.*
How to Take Screenshot in Laptop Windows 7
Older OS Windows 7 has less options but they are effective.
Method 1: Using the Snipping Tool
• Go to Start > All Programs > Accessories > Snipping Tool.
• Select the area to capture.
• Save the capture.
Method 2: Capture Whole Screen
• Entire screen can be copied using PrtScn button.
• Paste it into Paint to save afterwards.
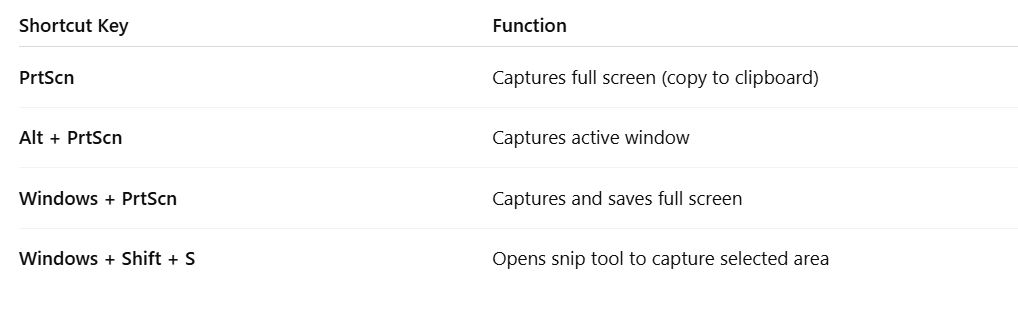
Shortcut Key to Take Screenshot in Laptop Windows 10
For the users of Windows 10, here are some shortcut keys that can come in handy in taking screenshot:
How to Take Screenshot in Laptop Mac (MacBook)
Mac users have a variety of ways to take screenshots:
1. Command + Shift + 3
• Screenshot of the entire display is taken.
• It is automatically saved to the desktop.
2. Command + Shift + 4
• Cursor changes into a crosshair.
• Drag and select the area you wish to capture.
• The screenshot will be saved on your desktop.
3. Command + Shift + 54
• Display a toolbar for screenshot options.
• You can choose to capture full screen, capture a window, or a portion.
• Screen recording is also available from this toolbar.
4. Command + Shift + 64
• (For MacBook Pro with Touch Bar) Show what the Touch Bar displays, and captures it.
How to Take Screenshot in PC
For desktop computers, the methods of taking screenshots are identical to those of laptop computers running Windows. Here is a brief summary:
• Print Screen (PrtScn) – Captures full screen.
• Alt + PrtScn – Active window only.
• Windows + PrtScn – Captures and saves the screen automatically.
• Windows + Shift + S – Opens Snip & Sketch for custom area capture.
• Snipping Tool / Snip & Sketch – Found in start menu.
As for the Macs, please follow the same shortcuts as stated in the Mac part above.
Where Are The Screenshots Stored?
Based on the method used, the screenshots might be:
• Automated saves in the location: Pictures > Screenshots folder.
• Cut out in clipboard and only retrieval is possible using Paint/Word application.
• Kept on the desktop. This is especially true for macOS.
Conclusion
With the knowledge of taking screenshots on laptops from brands like HP, Lenovo, and on operating systems from Windows 7, 10, 11, and Mac, capturing vital information is just a keypress away. Learning these screenshot methods as a student, employee, or leisure user will increase efficiency and simplify daily tasks.
Do you still feel lost? Save this blog so you can easily revisit it later!
Stay informed, Stay ahead and Stay inspired with WebMatriks